
Portable Ammo Can APRS iGate – 8 Watt HT, Ammo Can, Raspberry Pi, Xastir
Started: 3/25/17
These instructions below are for my setup of an Battery Powered, Portable, APRS iGate, using a Raspberry Pi 3, Baofeng 8 Watt and and TNC-PI running Xastir. The goal is for it to run remotely, unattended.
Total price is $350 and can be put together in about a day. No soldering is involved. If you are proficient in soldering and making your own cables, you can save maybe $100).
Supplies:
- Baofeng Radio $62.89 (I chose the 8 Watt Higher Power, the UV-5r will work also)
- Baofeng Battery Eliminator $14.89
- Raspberry Pi 3 $39.99 (Other models will work)
- Memory Card for Raspberry Pi, Keyboard, Monitor, Mouse, USB Power for setup, usb cable, hdmi cable, case (Or get a kit http://amzn.to/2nQQW4O)
- TNC-Pi 2 from Coastal Chip Works $40 ($65 wired and tested)()
- TNC-PI -> Baofeng Cable $20 (already made, or instructions to make one yourself.)
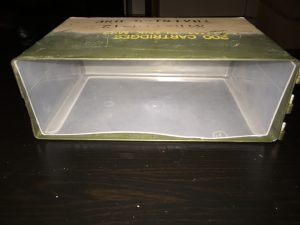
- Ammo Can (Local Army/Navy Surplus) $20 (10″ Tall, 3 1/2″ Wide, 6 1/2″ Deep)
- Plastic Storage Container (Any old plastic container will work, were gonna cut it up)
- SMA Female -> BNC Male Adapter $10.99
- BNC Whip Antenna $33.95 (For mounting on top of Ammo Can, of your own antenna with a BNC female connector)
Lithium Ion Jump Starter / Power Pack $79.99 (This model happens to have 12V DC and USB, 12,000 mAh – Days of power!)hours of power, looking for new one…
Hardware Setup:
- Wash, clean, and dry ammo can…
- Cut Plastic Storage Container
- I used a sterilite plastic container that was the perfect width for the bottom of the box. I cut the top and front to make a perfect tray that would slide into the ammo can.

- Attach the TNC-Pi to the top of the Raspberry Pi, then place the Pi in a case if you have one.
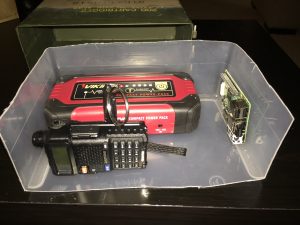
- Test fit everything on your tray
-
- Place and fit components on the tray. Make sure USB/HDMI/Power and Memory connectors for the raspberry pi are accessible, Baofeng screen is viewable, baofeng antenna connector facing hinge, power button for battery pack is accessible.
-
- Mount
- Velcro, Zip Tie, or Hot Glue stuff into place to keep it secure.
- Connect cables. USB Power (Battery Pack->Raspberry Pi), Battery Eliminator (Battery Pack->12V Adapter->Baofeng Battery Eliminator), Baofeng PTT Cable (Baofeng Radio -> TNC-Pi)
Software Setup:
- Download and setup the latest version of Raspbian. This guide was based on ‘Raspbian Jessie with Pixel 2017-04-10’
- Install Raspbian Jessie with Pixel, following these instructions.
- Boot up, connect to wifi.
- Setup the TNC-Pi, following their instructions. Pages 13-15 will get the AX.25 tools installed. Here is a brief summary that applies to the pi3 based on the 4-17-17 instructions. refer to the above link for updated instructions:
- Make sure your Pi is up to date
-
sudo apt-get update

sudo apt-get upgrade
-
- All pi’s need this change:
- sudo leafpad /boot/cmdline.txt
- remove:
- console=serial0,115200
- Note: If you miss the above line, Xastir will transmit fine, and may actually receive. It will probably cause a interface error in Xastir
- sudo leafpad /boot/config.txt
- add:
- enable_uart=1
- save, quit.
- Pi 3 needs the following changes:
- sudo leafpad /boot/config.txt
- add:
- dtoverlay=pi3-miniuart-bt
- core_freq=250
- save, quit.
- sudo leafpad /lib/systemd/system/hciattach.service
- add:
[Unit]

ConditionPathIsDirectory=/proc/device-tree/soc/gpio@7e200000/bt_pins

Before=bluetooth.service

After=dev-ttyS0.device

[Service]

Type=forking

ExecStart=/usr/bin/hciattach /dev/ttyS0 bcm43xx 921600 noflow -

[Install]

WantedBy=multi-user.target- save and quit.
- reboot
- Install & setup Xastir
- sudo apt-get install xastir
- Run Xastir and setup
- sudo xastir
- Note: If you skip sudo on the previous step, you wont be able to start the interface.
- First time you run Xastir, you wil get a config screen. (Or File->Config->Station) Enter your callsign in the callsign box.
- Enter your latitude and longitude
- Pick a symbol
- Enter HAAT info if you have it and any comments. Click OK.
- File->Config->Defaults
- Fixed Station
- We want to iGate, so Select ‘Allow RF to Inet traffic ONLY’
- Select OK.
- Adding the TNC-Pi Interface (Source)
- Interface->Interface Control, Add
- Select ‘Serial KISS TNC’, Add
- Port: ‘/dev/ttyAMA0’
- Port Settings: ‘19200 bps’
- Since we are planning on setting up an igate, select ‘Allow RF to Inet traffic ONLY’
- Leave the rest at their defaults, click OK.
- Select and start the interface?
- Adding the Internet Server (Source)
- Interface -> Interface Control, Add
- Internet Server, Add
- Enter you pass code in the passcode box
- Open a new terminal window
- Type ‘callpass XXXYYY’ where XXXYYY is your call sign
- It should return a number. This number is the same in all APRS applications.
- Change the filter parameters if you want. m/500 means that it will return 500km of APRS stations. I turn this down to 100 to save bandwidth.
- Click OK.
- Select the interface and click start.
- File -> Config -> Save Config Now
- sudo xastir
- Make sure your Pi is up to date
- To Run Xastir:
-
sudo xastir
-